Tutorials
Essentials of Digital Accessibility
- By Harriette L. Spiegel
- 09/13/16

Digital accessibility is a hot topic in higher education these days, and training faculty in creating accessible digital materials is on the mind of every instructional designer or educational technology team. The question of how to accomplish this training is a topic in itself, but this article outlines some of the most common issues that confront faculty when making their course content accessible. These issues are Headings, Alt Text, Meaningful Hyperlinks and Tables.
What is Digital Accessibility?
Digital Accessibility guarantees that the products of a computer, offline and online, will be available for all users. Many computer users who have disabilities depend on assistive technology to aid in interpretation of digital content.
Issues in digital accessibility arise when the assistive technology is unable to access the information because of incompatibility of some sort. A screen reader, for example, is a program that reads text from a document to the user with visual disabilities. With screen readers, an image is ignored unless alternative text ("alt text") is added when the digital document is created. If important content is contained in the image with no alt text, the screen reader user would encounter a barrier to the content. Other issues are common sense: If one uses color to denote meaning, such as instructions to respond to the "items in red," someone who is color-blind and cannot distinguish certain colors is not going to understand the instructions. If content is delivered by audio or video, the learner who cannot hear will need an alternative means of accessing the information, such as captions or transcripts. The learner with a learning disability will face barriers to learning with a confusing, inconsistent presentation of material.
There are many more issues such as captions and transcripts, and PDF files. A search on the Internet for "digital accessibility" and the specific term researched, such as "digital accessibility and screen readers" or "digital accessibility and audio and video files" will provide targeted information.
Accessibility ensures that digital material is truly accessible to all users. These products include our everyday Word or PowerPoint documents, as well as Google Docs. Advocates for digital accessibility also encourage users to practice good principles of Universal Design for Learning, a concept that reminds us that learners learn in different ways, and learning materials should "fit" all kinds, including students with disabilities. As architects consider Universal Design when designing buildings to meet as many needs as possible, Universal Design for Learning calls for design of learning to meet the needs of all learners. A key concept is to start accessibly from the beginning. Retrofitting may not always work. The reader is encouraged to learn more from links in the Resources below.
Common Issues
Learning Management Systems
Let's start with the learning management system. The LMS provider, such as Blackboard, D2L, or Instructure, is going to claim that the LMS is "accessible." This means that as it stands, a screen reader could effectively navigate the content — until outside material is added by the user. Therefore, it is imperative that the user — in this case a faculty member — understand the main concerns about digital accessibility. If material that is uploaded to the LMS is accessible, the screen reader will be able to appropriately interpret the contents to the learner. (In the particular learning management system's Help resources, accessibility tools are explained.) If, on the other hand, such uploaded material has not been created accessibly, the screen reader will not be able to interpret the content appropriately.
Headings
Word processing and presentation documents can be made accessible by using the built-in tools that the applications provide. Because Google Docs presentations do not offer equivalent options for setting some aspects of accessibility, it is suggested that a Google Docs presentation be saved as a PowerPoint presentation in order to add accessibility settings.
Microsoft Word: Headings
Rather than use the traditional Font Size, Bold, Italic or other buttons on the Microsoft Word Ribbon to set off your title, headings and subheadings, use instead the Styles options in the Ribbon toolbar for use in specifying heading levels and indicating a document's structure. To allow clear navigation of the document by the user of a screen reader, the screen reader must be able to distinguish between headings and normal text to provide meaning to the user, or all of the document's text will be read without any indication of structure. A visual learner scans a document to get an idea of the document's structure, perhaps aided by a table of contents.
To create accessible headings, select the text, and choose the appropriate Style.
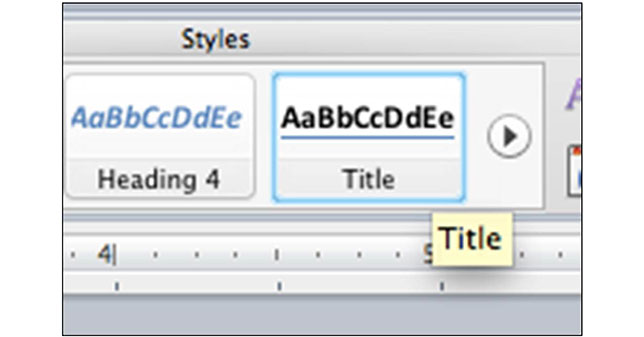
Title Style Selected in Microsoft Word 2011 Styles
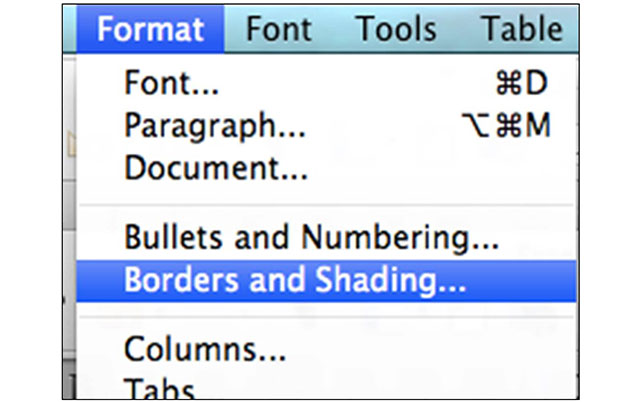
Borders and Shading Selected in Microsoft Word 2011
Rather than use the default line applied to a Title (on a Mac computer), I used the Borders and Shading tool (Format > Borders and Shading) to remove the line.
These Styles can be modified from the default settings. For instance, in this document, I have used the same Font (Cambria), Size (12) and Color (black) for all levels.

Modify Styles Selected

Additional options (...Emphasis, Strong) in Microsoft Word 2011 Styles
Microsoft PowerPoint presentations: Headings
Microsoft PowerPoint contains pre-formatted slide layouts that automatically provide levels or structure, as text is entered into the various placeholders: title, content; and the use of the built-in bullets and numbering tools provides structure for the learner using a screen reader. (To customize your fonts and sizes, use the Master Slide in setting the display of levels.)
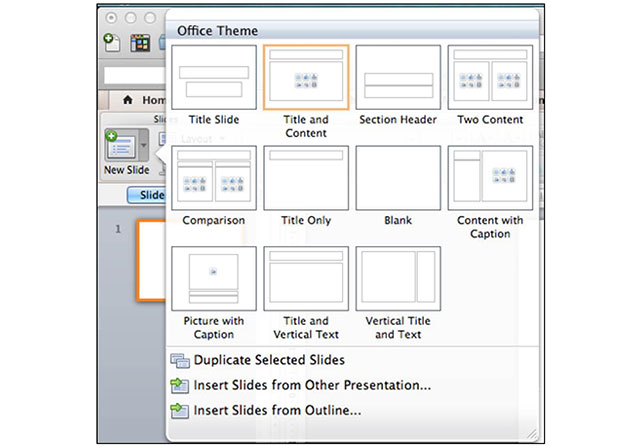
Microsoft PowerPoint 2011 slide layout options
At times, a title on a slide may not be desired; to maintain accessibility, use the visibility feature to "hide" a title: In PowerPoint 2013 (Windows), use Drawing Tools > Arrange > Selection Pane, and click the "eye" icon to hide or display the title text. Generally, use of the built-in slide layout will assure the correct reading order, but if other objects are added, it is a good idea to double-check the reading order. In the same tool, the reading order of the presentation slides can be manipulated as well. Drag the object to the desired order.
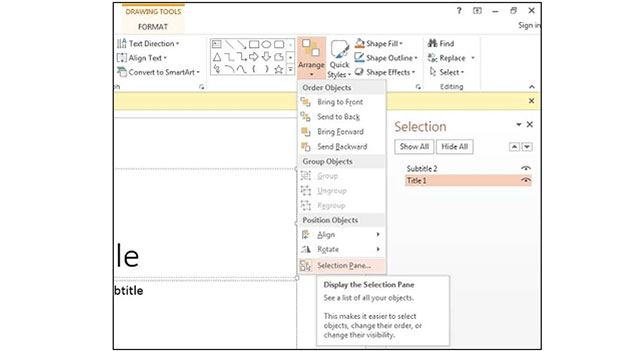
PowerPoint 2013 - Drawing Tools > Arrange > Selection Pane
In PowerPoint 2011 (Mac), the reading order can be manipulated using the Reorder Objects tool (located at Arrange > Reorder Objects). Drag the order in the screen with multiple slides to the desired order.
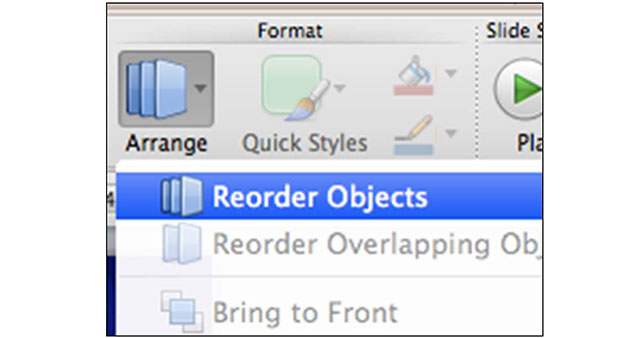
PowerPoint 2011 – Format > Arrange > Reorder Objects
Google Docs document: Headings
Similar to the settings in Microsoft Word, Google Docs has a drop-down menu for setting headings styles. However, the user sets the font, size, etc. first and then selects the text and sets the Style. Be sure to "update" the particular style to match your settings.
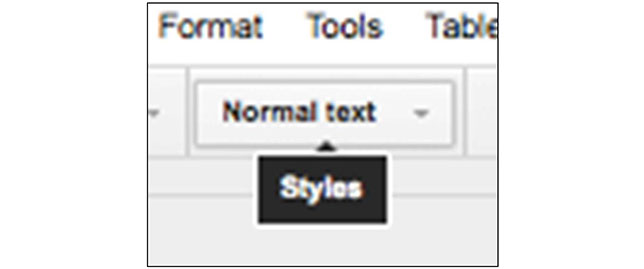
Google Docs - Styles list
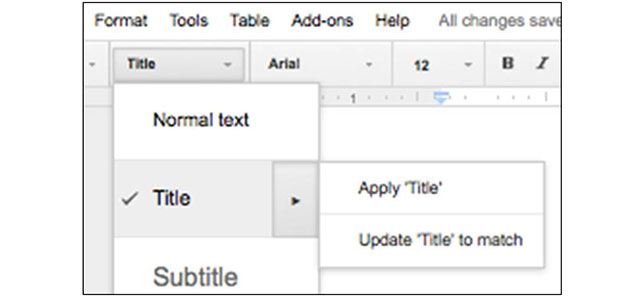
Google Docs - Heading style options/ Update heading...to match
Alternative Text ("Alt text"): all documents
Images or graphics are not read by a screen reader if they have not been created with "alt text." Alt text provides a description of the content of the image or graphic. Sometimes an image or graphic is merely decorative, so alt text is not necessary if the presence of the decorative image is not pertinent.
To ensure that any such content is communicated to the learner, there are three ways, in any application, to address the issue of content in an image or graphic.
- Provide a caption under the image (as I have done with the illustrations in this article).
- Describe the image or graphic in your text.
- Add Alt text.
Adding alt text will always be accomplished by selecting the image and finding the particular path to the Alt text description box.
Microsoft Word: Alt Text
While the actual buttons may differ between versions of applications, the steps are to select the graphic, go to Format Picture > Alt Text for the Mac, or Layout — or Size — & Properties for Windows, and add a description in the Alt Text box. (While there is a box for a title, this is mainly for web pages, and not necessary for documents.)
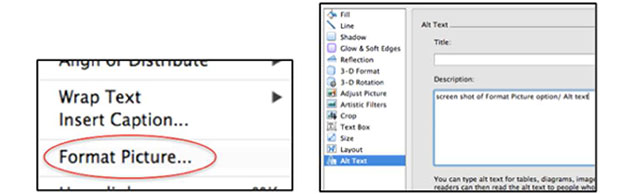
Right-click Format Picture > Alt text option, Word 2011 (Mac)
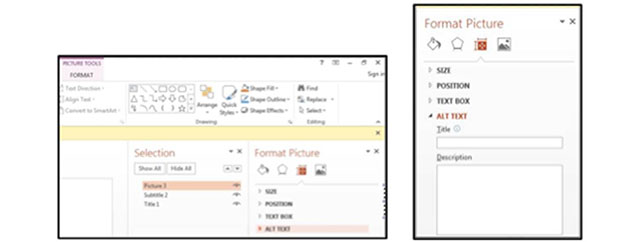
Right-click > Format Picture > Size & Properties > Alt Text - Word 2013 (Win)
Google Docs: Alt Text
In Google Docs, an image is made accessible by selecting the image and then choosing "Alt text" from the Format list:
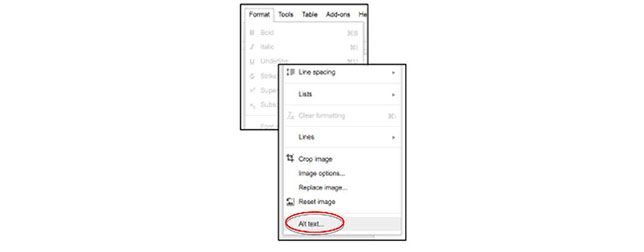
Google Docs - Format/ Alt text
Meaningful Hyperlinks: All Documents
The screen reader reads out a hyperlink description, but goes to the target web address, and if the hyperlink text that is displayed is not explicit, the screen reader user is left to wonder beforehand where the hyperlink is going. Never use a "Click Here" description for a hyperlink. To create accessible hyperlinks, the target description must be clear in the text displayed.
For instance, a hyperlink to the Google search engine, with the optional URL afterwards (but not as a hyperlink), would appear as:
Google search engine (http://google.com)
In my Resources below, I provide the name of the hyperlink's destination as the display text; I provide the URL itself only for informational purposes.
To create meaningful hyperlinks in any application, select the display text, and then either go to the toolbar and choose Insert > Hyperlink or right-click and choose Hyperlink (or Edit existing hyperlink), and enter the desired text to display and the target URL and click OK.

Right-click > Hyperlink > enter Link to and Display text
Tables: All Documents
Inaccessible tables present obstacles to a screen reader's interpretation of the content because the screen reader reads from left to right and up and down. To enable the screen reader to provide the desired information, follow these guidelines:
- Use simple table structure: no split or merged cells or nested tables; use the Insert > Table > New > Insert Table option instead of drawing a table.
- Do not use blank cells.
- If there is no caption or in-text reference, provide alt text by right-clicking on the selected table and choosing the Alt Text tab.
- Specify the header row by highlighting the table, choosing Table Properties, and "repeat as Header Row at the top of each page."
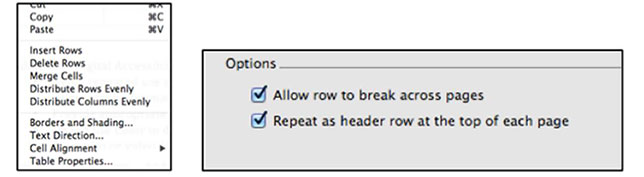
Right-click on Table > Table Properties > Repeat as header row
Additional Digital Accessibility issues:
- Avoid repeated use of spaces for adding white space; instead use the Format > Paragraph > Format Text > Spacing tools.
- Provide appropriate contrast in color for the text and background.
- Do not use Color to denote meaning.
- For audio or video files, provide captions or transcripts.
For Windows computers, the Microsoft Accessibility Checker (for versions of Office 2010 or later) will point out most of the accessibility issues for Word, PowerPoint, Excel. It is a best practice, however, to follow up with manual checks, as not all issues are "caught" by the Checker. Viewing a Word or PowerPoint document in Outline view should indicate the set levels.
There are many more issues regarding Digital Accessibility. Fortunately, the Internet is full of examples of why this topic is important, and of how assistive technology interacts with computers. The reader is encouraged to look for resources to learn what individuals with disabilities go through while using computers and navigating web sites. As suggested at the beginning, one should use the search term "digital accessibility" to avoid ending up with much more than one needs: for instance, "digital accessibility and alt text" will reward the user with succinct, relevant sites on the subject. Therefore, for the user who really does not know much about "digital accessibility" (including knowing what a screen reader sounds like), I would recommend looking at well designed, informative sites such as those listed in the Resources below.
Resources
Accessibility and Usability at Penn State - http://accessibility.psu.edu/
This site "explains how to ensure Web pages and online documents can be made usable for users with different disabilities."
CAST Universal Design for Learning - www.cast.org/our-work/about-udl.html
The Center for Applied Special Technology (CAST) is "an educational research & development organization that works to expand learning opportunities for all individuals through Universal Design for Learning."
DO-IT Videos - http://www.washington.edu/doit/do-it-videos
The University of Washington's DO-IT: Disabilities, Opportunities, Internetworking and Technology promotes inclusion and "success for people with disabilities."
Screen Reader User's Experience and MS Word - https://www.youtube.com/watch?v=D8XFkGMF0sw
If you have never heard a screen reader, listen to this video from the High Tech Center at Taft College.
The National Center for Disability and Access to Education (NCDAE) - http://ncdae.org/resources/
NCDAE provides resources on digital accessibility.
WebAIM (Web Accessibility in Mind) - http://webaim.org/
WebAim is an organization to "empower organizations to make their web content accessible to people with disabilities." Many of the issues pertinent to Web documents are applicable to the issues facing creators of accessible course content.

