8 Tips for Lecture Capture on a Shoestring
Maybe you've seen "Video Dad," the professor whose video interview on South Korean politics with the BBC was interrupted when his young daughter danced into his office, followed by a baby scooching along in a walker, followed by a harried mom trying to rescue her family from the prying eyes of the world and salvage her husband's broadcast career.
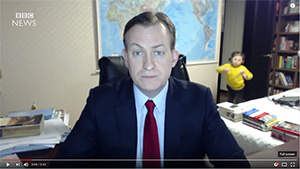
BBC commentator Robert Kelly's "Video Dad" moment
When Raul Burriel watched that video, he saw somebody with "considerable experience doing these kinds of interviews." After all, said the streaming media coordinator for Oregon State University, video dad Robert Kelly had things positioned in just the right way. The video camera is above him, pointing downward. He has positioned his own books strategically on his desk. And the space he uses is narrow, in the sense that the wall behind him is maybe four or five feet away. Burriel's guess: Notwithstanding the domestic interruption, Kelly has "probably evolved and developed this layout and look over a number of interviews."
Burriel oversees what he calls the "media ecosystem" at his university, a topic on which he speaks nationally. While Oregon State maintains media production units for creating high-quality video, these days, he noted, "everyone's got a video creation device in their pocket." In fact, he estimates that 90 percent of the video creation done on campus is user-generated content, whether it's faculty making videos to help students learn, students creating videos for assignments, webinar production or extension service tutorials made for people out in the field.
Oregon State University Streaming Media Coordinator Raul Burriel
Here's what Burriel has recommended for setting up a production studio to make videos with impact — and on a tight budget.
1) Speak Into the Microphone
When setting up a space for good video and audio recording, sound dampening is key. You want to make sure you don't get noise from people walking in the hall outside, for example, or from machines such as elevators or climate systems. While these factors can't be avoided entirely, Burriel noted, they can be addressed with insulation on the walls or a switch that opens or closes the air handling in the room.
Also, choose a quiet space to minimize ambient noise. Or as Burriel put it, "Don't choose a space where there's a basketball court upstairs."
Next, Burriel said, pay attention to your microphone. If you're creating a recording from a computer, for example, oftentimes you'll expect to use the "little pinhole" mic at the top of the PC or iMac monitor, which could be three or four feet away from where you're sitting.
Burriel's suggestion: Use a headset with a mic right by your mouth or a "boom mic" that you can have near you. Either of those options "is always better than whatever is built into your laptop or iMac," he said.
If that exceeds your capacity, then at least do these two things: "Lean in toward the mic" to direct your voice and make sure it captures your audio "to the best of its ability," and avoid "wiggling too much in your chair."
2) Reconsider Whether You Want to be a Talking Head
Lighting is a trickier topic, worth "deferring to professionals." Burriel said he's seen too many videos that come across "like some person hunched over a laptop looking to the camera recorded at two in the morning where it's really dark behind them and the only light you see is the glare of the monitor on their face."
His advice: Ask yourself if you need to appear in the video in the first place. "Oftentimes as a professor doing a presentation, what is paramount is the screen content," he explained. "In most of our recording scenarios, we simply do not have cameras. It is not relevant to the content, and it boils down to a question of vanity." When it comes up, he added, so do questions about how the hair looks, whether makeup is necessary or whether there's a shine on the instructor's forehead.
In those scenarios where a "talking head" is essential, such as in faculty introductions for online classes, Burriel strongly recommends recording them "in a professional space with a professional videographer behind a camera and professional lighting." In fact, to save time, all of the introductory videos for a course could be recorded in one sitting and banked up for future use.
If you don't have that option, he suggested, then keep these practices in mind:
- Turn on the lights in your room and use lamps without lampshades to limit shadows and maximize the visuals while reducing glare. Then position the lighting so it's off camera;
- Stay "aware of your mannerisms" to prevent weird shadow shifting; and
- Plan on taking two or three different recordings "until you discover the best solution" for key lighting and backlighting.
"It's all about being aware of what you're doing before you do it," he said.
3) Keep Your Recording Device Steady
Burriel doesn't recommend any specific type of hardware for recording. After all, he said, "The latest generations of mobile phones have exceptional cameras built into them." But he does recommend "something that is steady."
If you're using your smartphone or tablet, get a tripod — "something you can pick up at Amazon for $9.99" or, if your budget allows, a clamp GorillaPod tripod from Joby. At the very least, stabilize the device against books or rocks. "I've seen videos that look perfectly fine and never realized that guy probably propped it up in a tree branch," Burriel said.
While you're at it, make sure you have it set horizontally. "Vertical video is the bane of my existence," he added. "While a number of students will view your video on a mobile device where vertical video is fine, it doesn't look so good on desktop platforms."
Then, if your phone allows you to do so, flip the camera image around so you can see yourself to make sure it's positioned correctly. Positioning gets into "selfie techniques," Burriel said. "A selfie always looks better if you hold the camera up above you and point it down than if you were to hold it below you and point it upward at your chin."
4) Avoid Using the Camera Built Into Your Laptop
Companies vary in where they position their laptop cameras. Most, said Burriel, have them located at the top middle. Others have it on the side in a corner. And some, such as certain Dell XPS laptops, have such narrow bezels, the cameras are squeezed into the bottom of the screen, resulting in videos "where you are basically looking up your nostrils — not at all an ideal situation."
If you have no choice but to use the built-in webcam, then he recommended positioning the laptop "on a stack of books so that it's actually looking down at you." The problem with that, he noted was that it also repositions your monitor and keyboard, which you may want access to. His solution: acquiring a low-cost Logitech webcam that can be attached by a cable to a USB port on your computer. "They can move around. They're designed by and large to clamp onto laptops but not exclusively. They also tend to stand on their own as well," he said.
At the same time you get that webcam, consider a wired or wireless microphone. A headset with both earphones and mic will work if you're not doing headshots; otherwise, "it looks really silly on your head." But if you're sitting in front of your device recording yourself talking, consider a Blue mic that plugs into a USB or Lightning port or a wireless solution that attaches to your lapel. Either would look fine, even if they show up in the video.
5) Explore a Range of Recording Software
If you're using your smartphone to record videos, it already includes software to handle the capture. The same with a laptop outfitted with a webcam, either internal or external. To take your production operations "a step further" and do screen recording or a slideshow presentation, you'll need additional software. But that doesn't mean you need to spend money.
Burriel points to Screencast-O-Matic, a free option that allows you to record up to 15 minutes and save your recording as a file or post it to YouTube. (A $15/year "pro" version expands your options, allowing you to make longer recordings and publish to other locations.)
Up from there, Burriel noted, it's a "sliding scale" that includes feature-rich programs as TechSmith Camtasia, Adobe Captivate and Adobe Presenter. These are "so much more than just screen recorders," he insisted. Videos can include bookmarking, allowing viewers to run a text search and be taken directly to a specific part of the recording. "It's the difference between a basic or what I sometimes call a 'dumb' recording and an enhanced or 'intelligent' recording," he explained.
A step beyond those dedicated applications are "online video platforms," including TechSmith Relay, Panopto, Tegrity and Kaltura (the "800-pound gorilla that everyone is trying to play the me-too games with"). These OVPs, as Burriel refers to them, include a recording component and are typically licensed by the institution for full campus usage for managing and delivering videos as well.
6) Forget About Editing Your Videos
"Editing scares a lot of people in the video world," observed Burriel, adding, "I probably fall into the domain of people who get scared."
His suggestion is to keep videos at two to five minutes in length and never to edit them. "It's a lot easier to delete it and produce another three-minute recording than it is to spend 30 minutes trying to edit out all the 'ums' and 'ahs'" of a longer recording.
Other advantages of shorter videos are that students are more likely to watch them all the way through, and the concepts covered are more likely to be retained. "My recommendation to professors who want to record lessons is that they chunk up or cut up their presentations into very small consumable bits," he said.
While you're at it, he said, work from a basic script — even bullet points —to keep the videos concise and on point.
7) Remember Accessibility
Accessibility, declared Burriel, "is paramount in all student content." For videos, that means providing captions. Fortunately, there is "no shortage of caption providers out there right now." (A list is provided on the website for the National Association of the Deaf.) Those will usually charge between $2.50 and $5 per minute of recording, he estimated, and give you turnaround time of between 24 and 48 hours.
You can also provide your own captioning from a script, if it's detailed enough — meaning "at least 99 percent accurate." If you need to transcribe the audio from your video manually, Burriel suggested this hack: Record your video and upload it to YouTube. YouTube will apply its machine transcription to the audio as a starting point. Then you can download the captions into your caption editor and improve on the captions from there. Afterward, you can delete the video from YouTube and add it to your institution's platform.
When you use an institutionally licensed platform such as Kaltura to host your videos, you gain a lot of benefits, said Burriel. For one, it integrates with the learning management system. For another, it accommodates the policy requirements related to accessibility. On top of those, however, is another significant difference, related to copyright.
As Burriel explained, "You can have a scenario where a copyright holder will say, 'Yes, it is fine for you to share this documentary I have made with your students in a secure environment so long as no one but your students enrolled in this class can watch this video.'" YouTube can't meet that requirement, he noted. If you uploaded a copyright holder's documentary onto YouTube, the video service's ID system would recognize it as copyrighted content and could shut you down altogether. That's an important consideration when there's "basically one user ID for an entire institution." Getting shuttered would mean every video posted by your school would be taken offline. "That can be catastrophic," he pointed out.
8) Think Before You Record
While not everybody can expect to go viral like "Video Dad," there's no reason you can't make your production the best it can be on a budget. Burriel's final advice: "Always put some thought into what you're doing before you do it, and then after you've done it the first time, scrap it and do it again." After all, "Your first video is never going to be as good as your last video. It's all about comfort and experience."