How To Set up Three-Point Lighting for a Single Subject
Lighting for video can be intimidating, but setting lights up for a single subject, such as a lecturer or someone webcasting from a desk, only takes a few minutes and will improve the quality of your final product immeasurably.
The lighting scheme for a single subject is called three-point lighting. It includes a key light, a fill light and a back light.
Key Light
| |
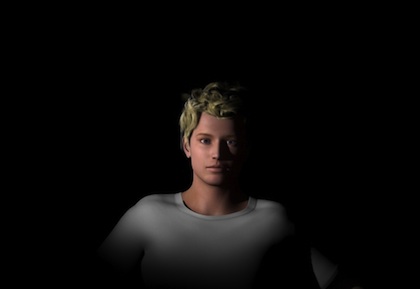
A model of a subject lit with only a key light. |
|
As the name suggests, the key light is your main light and your brightest, the key to the whole scheme and the first one you want to set up.
Start with your light at about the same distance from your subject as your camera, probably about six feet, but at a 45-degree angle off the axis formed by your subject and camera. If you're using a stand (as opposed to lights hanging from a studio ceiling), begin by adjusting the light so that it's as tall as it can get while still reflecting in your subject's eyes. You want to see them twinkle a bit.
Now look for the crease in your subject's face that runs from their nose to the outside of their mouth. If you have trouble seeing it, ask them to smile to get it to pop out a little bit. As you move the light from side to side, the shadow of their nose will move around. You want the edge of that shadow to fall right along their smile crease.
Fill Light
| |
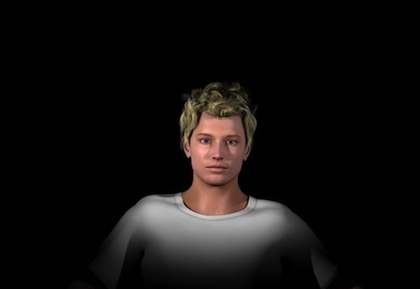
A model of a subject lit with a key light and a fill light. |
|
Now you have a bright light on your subject. You can see them just fine on your camera's viewfinder, but they have some harsh shadows, like the one cast by their nose, falling across their face. You need a light to fill those areas.
The fill light should be a little dimmer than your key light if possible. It's also a good idea to use a gel or screen to diffuse the fill light a bit. We just want to soften shadows here, not eliminate them, as they give depth and keep your subject from looking like a cardboard cutout.
Place the fill light at the same height and distance as your key at about a 45-degree angle off the axis between the camera and your subject.
You now have a perfectly serviceable two-point lighting setup for an interview. If you don't have a third light, you can stop here and your video will look pretty good.
Back Light
| |
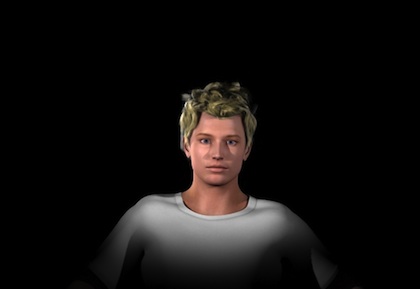
A model of a subject lit with three-point lighting. |
|
Your subject looks great now. Her face is lit up, the brightest thing on the screen, and softened with shadows that give it depth and bring it to life. But she also blends into the background a bit, perhaps looking almost as if she's coming out of the wall. That's where the back light comes in.
This light should be no stronger than your fill light, and if you have barn doors on your light, you may want to close them a bit.
Again using the axis formed by your subject and camera, set your back light at about a 45-degree angle behind your subject and on the same side as your key light. It should be about the same height as your other lights, but you may need to lower it a bit.
The placement of this light will take some tweaking. Just move it around a bit here and there and check the image through your camera. You want the light to highlight the edge of her shoulder and hair or face, but not to come around and light her cheek or spill into your camera's lens. When set properly, she'll have a thin sliver of light along one side of her silhouette separating her from the background.
That's it! You're now ready to shoot video lit like the pros.
| |
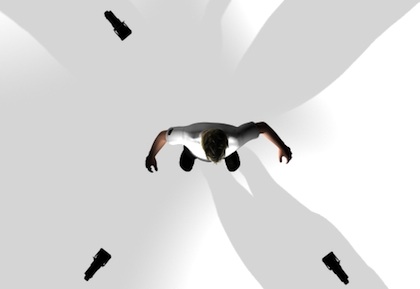
An overhead view of a three-point lighting setup. |
|
|
Extra Credit
3 Simple Variations on Three-Point Lighting
Three-Point Lighting Outside
Three-point lighting with the sun is even easier than using lights inside. Position your subject with his back to the sun, using it as a back light. For the key light, use the white side of a photography reflector, or anything white, like a big piece of poster board, to bounce the sunshine back onto his face. The light bouncing all around outside will take care of the fill light for you.
Silhouette Lighting
If you have a subject who wants to remain anonymous, silhouette lighting is a simple and effective way to get them on camera without showing their face. Simply use a back light with no key or fill lights. You may want to bring the light closer to the camera/subject axis, but be careful not to bring it so close to the line that it spills past the subject and into your lens. It'll create a flare that will distract viewers.
Adding a Kicker
Want to jazz up your image a bit? Use a fourth light to add a bit of accent to the background. You can stick this light on the floor behind your subject or just outside your camera's frame of view near the background. Close the doors on the light (or use a couple pieces of heavy paper or cardboard) until only a sliver shines through at about a 45-degree angle to the ground. Adjust it so that it falls across the background with the top of the line on the same side as your back light.
|